JWT Authentication using node(Nestjs),Mongoose,Passport,ionic5 .. PART1

we are going to build a JWT authentication using Nestjs as a back end with Mongodb as a database and Ionic 5 as a front-end
Pre-requisites :
- some knowledge of nodejs
- some knowledge of ionic (angular)
- MongoDB account
- development environment like Vscode
What is Nestjs?
Nestjs is a Node framework built with and fully supports of TypeScript ,Nest makes use of robust HTTP Server frameworks like Express.
What is JWT authentication?
JSON Web Token (JWT) is a standard used to create access tokens for an application, the server generates a token that certifies the user identity and send it to the client.
without further ado let’s start building our backend server
1:setting up the project
first we need to check that nestjs is installed in our pc ,to do that run this command in your cmd or the vscode terminal
$ nest --versionif nest is not installed run this command to install it
$ npm i -g @nestjs/clinow lets create a new Nest project named “nestjs-auth“ by running this command
$ nest new nestjs_authnow go inside your project directory
$ cd nestjs_authafter that we need to install some dependencies that we need in our project
$ npm install --save @nestjs/mongoose mongoose-we are going to use mongoose since it’s the most popular MongoDB object modeling tool you can use the built-in TypeORM module
$ npm install --save @nestjs/passport passport passport-jwt$ npm install --save-dev @types/passport-jwt
-Passport is an authentication middleware for Node.js , it make our life easier . we installed the @types/passport-localbecause it provides assistance while writing TypeScript code and the--save-dev because we want to install it as a dev dependency
$ npm i bcrypt
$ npm i -D @types/bcryptbcrypt is a function we’re going to use in order to hash user password
$ npm i --save @nestjs/configthis config package is going to help as using the dotenv in our project that we are going to talk about it’s importance later
$ npm i --save jsonwebtokenwe’re going to use a method from the jsonwebtoken later
after we installed the dependencies we need to create a .env file inside our project and add the MONGO_URI we got from our mongodb inside it and later we’re going to remove the .env from git because our mongoURI contains some information we don't want to publish to github
MONGO_URI="mongodb+srv://yourname:passwordexemple5@cluster0-hsoop.azure.mongodb.net/projectname?retryWrites=true&w=majority"after saving the .env file we need to update our app.module.ts as following
we imported our MongoosModule to our root app.module , if you are familiar with mongoose the .forRoot() methode accepts the same configuration as mongoose.connect().
we also imported ConfigModule so we can use the process.env
2:creating our user
we finished with setting up the project now we are going to create our user schema
in order to do that let’s create a models directory and a user schema file
src/models/user.schema.tsthen update it as following
first we create the mongoose schema for our user, every user has a unique mail and a password.
the UserSchema.pre() method is going to be executed before saving the user to database , with the help of bcrypt the password is going to be hashed first we create the hash from our pass then assign the result to our user password variable
now let’s create a user interface which we’re going to use later ,in order to do that let’s first create our user.ts file under types folder
/src/types/user.tsand update its content as following :
now lets create the user module and service with the help of our nest cli commands
$ nest g module  user
$ nest g service user --no-spec
“g” is for generate and the “no-spec” to prevent the cli from creating a testing file since we are not going to use it in this tutorial, these 2 commands will generate a user.module.ts and user.service.ts under src/user
update the user.module.ts as following
we impored the mongooseModule and the userSchema to our user module then we used the forFeature() method to import the user schema in the current scope
now our schema is registered ,so we are going to inject the User model inside our user.service.ts using @InjectModel decorator our file is going to look like this:
3: implementing the user registration
before we start editing the user.service lets create a register DTO, a DTO is an object that carries data between processes it’s a great way to reduce the number of calls between the client and the server
src/user/register.dto.tsupdate the content of the file as following
now lets move on to editing the user.service.ts in order to create the user register method so first update the file as following and let’s break it down
so we what we imported our register DTO after that we created an asynchronous function to save a user in the database , our method takes the registerdto as a parametre then we took the email from it and assign it to the const email ,” const {email}=registerDTO” is the equivalent of const email=registerDTO.email
we used that variable to see if we have the same email in the database since it’s unique and assign the result to the user , if we have another user with the same email we throw an exception otherwise we save the registration information to our database and return a user object without the password with the help of sanitizeUser method we wrote under the create method
3: Authentication
now let’s generate some files using the nest cli
$ nest g module auth
$ nest g service auth
$ nest g controller auth
this will create an auth folder for us , under that folder create this file
src/auth/login.dto.ts
update it’s content as following
now the auth.service.ts
first we injected the userService inside the constructor then we created signPayLoad method that takes “payload” as a parameter then we used the sign function from the jsonwebtoken package to help us generate the token and return it as a string, the sign function takes 3 parameters: the payload, the secret key ( we create our SECRET_KEY variable inside the .env file) and the expiration time
now let’s update the user.controller.ts
let’s break this down step by step
first we injected the userService and the authService like we did before
then we created the register method we used ‘@Post(‘register’)‘ this is called a decorator its purpose is to associate classes with required metadata and enable Nest to create a routing map
the register method takes a single parameter (registerDto) we are going to take that parameter from the request body that’s why we need the dedicated decorator @Body()
we used the create service from the userService to save the new user and take his email to create the payload that we gonna use to generate the token after that we return both the user and his token
same thing for the user login except that we used the findBylogin which is going to check if the user exists or not in the database
now that we finished with the user controller we can test our application but it’s going to generate an error since we did not export the userService before using it inside our auth module
to do that first export the user service from the user.module.ts
exports: [UserService]and import it inside the auth.module.ts
imports: [UserModule]now let’s run our server to test the login and register before we see the authorization
$ npm run startthis will launch our server we can test the application using postman

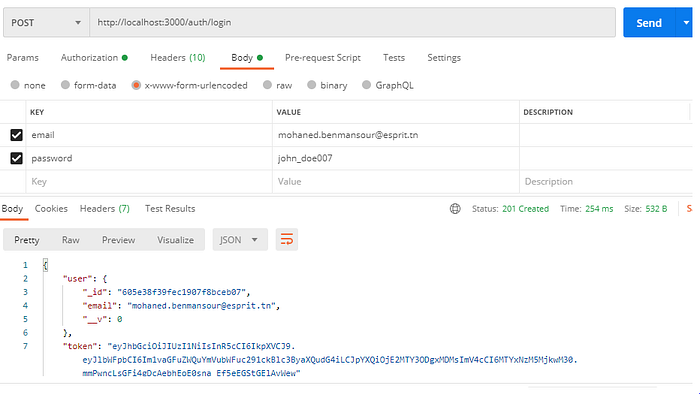
as you can see we tested the /auth/register , we passed the email and password to the body request and we got a json object that contains the user (with no password) and the token
same thing for the auth/login , but what if we enter a wrong email or password

we get a 400 status with a message : invalid credential
4: Authorization
we finished with the authentication now we are going to implement the authorization to protect some endpoints from unauthorized users , if you don't know the difference between the two here is an explanation
authentication: verifies who you are
authorization: decides if you have permission to access a certain resource
first we need to add a new method inside the user.service.ts called findByPayload that checks if the user exists or not from his email
our new user.service.ts will look like this
now create a new method inside the auth.service.ts called validateUser , our auth.service.ts will look like this :
now let’s create a new file => src/auth/jwt.strategy.ts
and update it’s content as following
things starts to look a little bit complicated so let’s understand together what’s going on here
this strategy requires some initialization, so we do that by passing in an options object in the super() call
jwtFromRequest: supplies the method by which the JWT will be extracted from the Request. We will use the standard approach of supplying a bearer token in the Authorization header of our API requests
secretOrKey: we are using the expedient option of supplying a symmetric secret for signing the token. Other options, such as a PEM-encoded public key, may be more appropriate for production apps
For the jwt-strategy, Passport first verifies the JWT’s signature and decodes the JSON. It then invokes our validate() method we’re guaranteed that we’re receiving a valid token that we have previously signed and issued to a valid user.
you can learn more about his approach from here.
now inject the jwt strategy inside the auth.module.ts providers
providers: [AuthService,JwtStrategy]and update the auth.controller.ts as following
we created 2 methods the hiddenInformation and publicInformation
we used the useGuards decorator to protect that endpoint from unauthorized users with the help of the jwt strategy we created
let’s try it out with postman
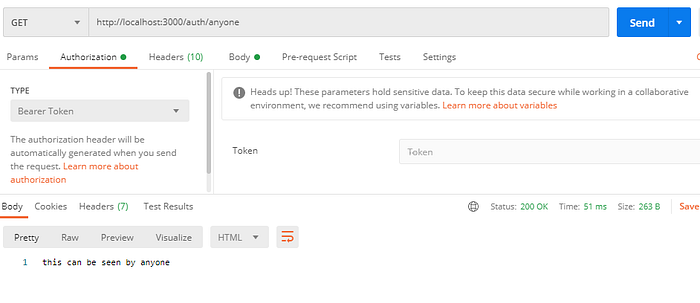
this is the first endpoint /auth/anyone we received the message without any problem even though we didn't add the token ,and that’s because the endpoint is not protected with the authguard now lets try /auth/onlyauth

this time we received a 401 error with the message: ”unauthorized”
now lets add the token and try again

this time we received our hidden information without any problems
we finished with the nestjs tutorial ,you can find the code for the project here
link:https://github.com/mohanedbenmansour/nestjs_mongodb_jwt_auth
stay tuned for the part 2 where we are going to build the front end for our project using ionic 5